Set up Wireguard VPN in Docker on Raspberry Pi
Run your own home VPN using Wireguard in a Docker container on a Raspberry Pi.

In this tutorial, you will be able to run your own home VPN using Wireguard in a Docker container. If instead you would like to see how to deploy Wirehole (Wireguard + Pi-hole + Unbound DNS) in Docker, please check out the write up for that here.
Why use Wireguard
Cut the BS and show me how
Wireguard is a relatively new and lightweight VPN protocol that has several advantages over more established options like OpenVPN or IPSec. Some reasons why you may want to consider using Wireguard as your VPN include: it has a smaller codebase and is therefore less likely to contain security vulnerabilities; it has a simpler configuration and can be set up quickly; it has better performance and can handle a higher number of connections; it is more efficient and uses less resources on your device; and it has been audited by several independent security experts and has been found to be secure. Additionally, Wireguard is supported on a wide range of devices, including Linux, Windows, Mac, iOS, and Android.
with your home network?
By setting up Wireguard on a device on your home network, you are able to access all resources on your home network even while you're away. Some notable use-cases are turning on your computer from anywhere in the world, remotely accessing your computer securely, and accessing your own selfhosted webservers such as Pi-hole which are usually inaccessible from outside your home network.
Setting up your VPN
Prerequisites
- Terminal access to Raspberry Pi
- Docker installation on Raspberry Pi
- Portainer on Raspberry Pi
- Home wifi router access
- Dynamic DNS (see how to set up DDNS using Cloudflare for free) or use your own static ip address at home (usually not free)
1. Deploy Wireguard VPN with Docker
Deploying Wireguard VPN on your home network is so much easier when you use Docker Compose.
You will need to change the following details in the docker-compose.yml before deployment:
PUIDandGUID(how to get PUID and GUID)SERVERURL(see how to set up DDNS using Cloudflare for free)
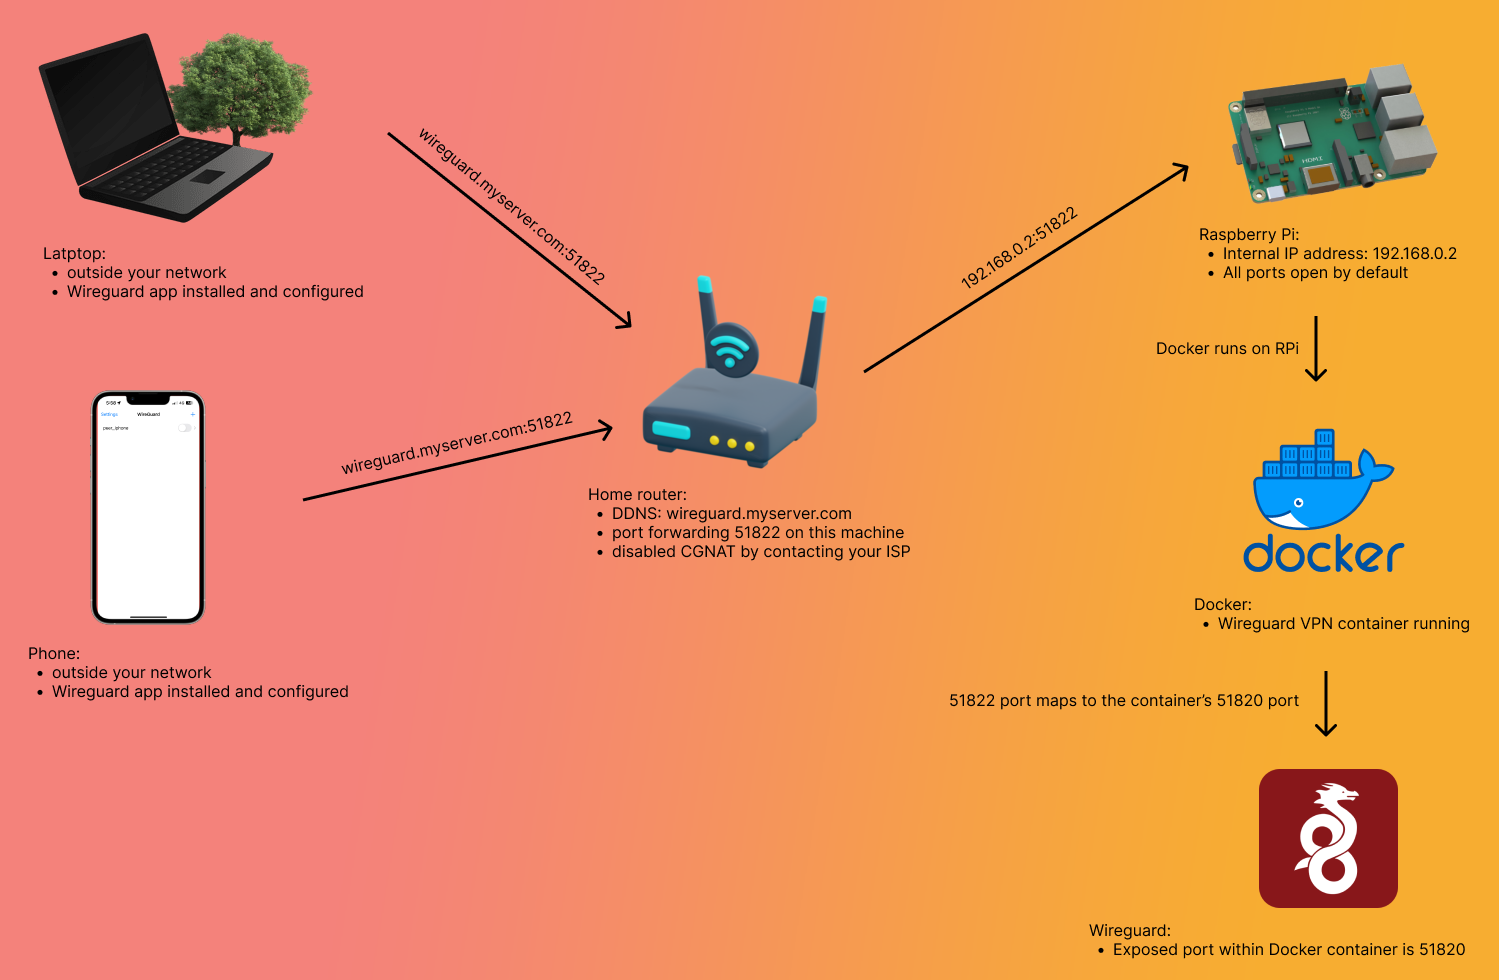
This docker-compose.yml file will essentially create your VPN and open it on port 51822 with 3 "peers" (files that allow connecting to the VPN) each called "peer_macbook", "peer_iphone" and "peer_ipad". You can modify these names or add/remove any names in PEERS environment variable to suit your needs. Additionally, all the Wireguard data will be generated in a folder located at /srv/disk/Appdata/wireguard.
Once you have made the necessary changes to the file above, add a new stack to Portainer.
2. Set up port forwarding on your router
Now here is the tricky part. As everyone has a different make/model of home wifi routers, it is best to do a web search for "how to port forward on {{ROUTER NAME}}".
You will need to add the following port forward details:
Port range: 51822-51822
Local IP: IP address of Raspberry Pi (e.g. 192.168.0.2)
Local port: 51822
Protocol: UDP
Adding this to your router means that you will be exposing the port 51822 on your router to the rest of the world. Without this, you cannot access our home network!
You may also want to check that you don't have CGNAT enabled with your ISP. See what CGNAT means as explained by Aussie Broadband.
3. Set up your devices to access Wireguard VPN
We will showcase the setup using a phone. Similar steps can be taken for setup with other devices.
- Start by downloading Wireguard from Google Play or the App Store
- In Raspberry Pi terminal, type
docker exec -it wireguard /app/show-peer iphone(changeiphoneto one of the peers you set up earlier). You will be shown with a QR code. - Using the Wireguard app on your phone, scan the QR code and you will be set up.
- If scanning a QR code is not an option, as is the case when setting up a Macbook, you will need to download the config file directly from your Wireguard directory on your Raspberry Pi. Learn how to copy files between machines.
Done!
Now you can access your home network while connected to your very own VPN!
See what you can do with your new superpower:
- Turn on your computer from anywhere in the world
- Remotely access your computer from anywhere in the world
- Manage your Raspberry Pi web services from anywhere in the world
- Use Pi-hole blocking everywhere you go
- Control your smart lights from anywhere in the world
How can I check it's working?
It is best to use your phone for this part as it can easily switch between mobile data and your home wifi.
- While connected to your home wifi, search on Google "what's my ip?"
- Google will return your public IP address, which is the address of your home network.
- Now switch to mobile data/cellular on your phone, and refresh the Google search "what's my ip?". You should notice this to be different from the previous search.
- Now turn on your VPN in the Wireguard app while keeping mobile data on your phone. When searching on Google again, the IP address should now be the same one as your home.
What does it look like?